A Short Guide to Testing Ionic App Templates & Directives
Using Karma for quick low-level integration testing
This guide follows Volta Jina’s approach to Angular testing, where Karma specs are written for logic embedded in the templates and validation is done by checking element behavior. Some nice examples of this strategy can be found at the Angular Material project.
We will be using the ionic ‘tabs’ starter as a base. Testing Ionic apps has its idiosyncrasies: ui-router and ionicTemplateCache trigger lots of ‘unexpected request’ errors from the test runner - in fact it’s common practice to disable them. This means accessing templates and their controllers requires some extra steps. We’ll walk through these, write tests for a tab view and then look at a directive that uses cordova plugins.
Table of Contents
Setting up the test environment
Testing a controller and its template
Testing a directive that uses cordova plugins
The Test Environment
karma: the test runner
jasmine: the testing framework
chrome-launcher: for event and debugging support (instead of phantom.js)
ng-html2js-preprocessor: to consume templates as javascript strings
mocha-reporter: for nice test reports.
jQuery: for finding elements.
angular-mocks: for mocking services like $timeout and $http
(None of these packages will ship with your app - they are part of the development environment)
At the command line in your project directory run:
$ npm install karma --save-dev
$ npm install -g karma-cli
$ npm install jasmine-core --save-dev
$ npm install karma-jasmine@2_0 --save-dev
$ npm install karma-chrome-launcher --save-dev
$ npm install karma-ng-html2js-preprocessor --save-dev
$ npm install karma-mocha-reporter --save-dev
$ npm install jquery --save-dev
$ bower install angular-mocks --save-dev
Create a karma config file by running:
$ karma initKarma will ask you a series of questions about which frameworks to use (jasmine), what browsers to launch (chrome) and what files to watch. Skip through this, pressing return after everything. There’s a section below on modifying the config file manually once it’s generated.
Add the following task to your project’s gulpfile.js:
var Server = require('karma').Server;

gulp.task('test', function (done) {
  new Server({
    configFile: __dirname + '/karma.conf.js',
    singleRun: false
  }, done).start()
});
Ultimately, when you’re ready to test you’ll run:
$ gulp testMake some folders for your tests
(Or think about where to put them).
You could, for example, run the following in the project’s root directory:
$ mkdir tests
$ mkdir tests/controllers
$ mkdir tests/directives
$ mkdir tests/services
There is another, perhaps better strategy advocated by John Papa which says you should store tests alongside their targets - i.e maintain a directory structure like this:
|-- Controllers
|   |-- SomeCtrl.js
|   |-- SomeCtrl.spec.js
|   |-- AnotherCtrl.js
|   |-- AnotherCtrl.spec.js
The idea here is that the tests are an integral part of the code and should be kept close at hand. This project is small and doesn’t have much directory structure so we’ll just put our tests in a dedicated folder.
Edit karma.config.js
(The full config for this project can be found here.)
List jQuery first in the files array, then the ionic bundle and other lib files, then your html files, then any other js files you’ve declared in index.html and your test files.
files: [

   'node_modules/jquery/dist/jquery.min.js',
   'www/lib/ionic/js/ionic.bundle.js',
   'www/lib/angular-mocks/angular-mocks.js',
   ...
   'www/templates/*.html'
   ...
   'www/js/app.js',
   'www/js/addContact.js',
   'www/js/controllers.js',
   'www/js/services.js',
   ...
   'tests/*.js'
],
Define your custom launcher, enumerate your plugins, specify your pre-processors, and select your reporter, as below.
customLaunchers: {
  Chrome_without_security: {
     base: 'Chrome',
     flags: ['--disable-web-security']
  }
},

plugins: [
  "karma-chrome-launcher",
  "karma-jasmine",
  "karma-mocha-reporter",
  "karma-ng-html2js-preprocessor"
],

preprocessors: {
  'www/templates/*.html': ['ng-html2js']
},

ngHtml2JsPreprocessor: {
   moduleName: 'templates',
   stripPrefix: 'www/'
},

reporters: ['mocha'],
Now Karma will launch in chrome, pre-cache your templates (to avoid router calls) and print intelligible color-coded reports. Lets write some tests.
Testing ChatsCtrl
.controller('ChatsCtrl', function($scope, Chats) {
  $scope.chats = Chats.all();
  $scope.remove = function(chat) {
    Chats.remove(chat);
  };
});
That’s ChatsCtrl: an archetypically ‘thin’ controller whose sole purpose is to expose service methods to the DOM on $scope. A traditional unit test for it looks like this:
describe('ChatsCtrl', function(){

    var $scope, $controller, Chats, ctrl;

    // Load app
    beforeEach(module('starter'));

    // Inject services and spin up the controller
    beforeEach(inject(function(_$rootScope_, _$controller_, _Chats_){

        $scope = _$rootScope_;
        $controller = _$controller_;
        Chats = _Chats_;

        ctrl = $controller('ChatsCtrl', {$scope, Chats});

    }));

    // Tests
    it('should bind all chats to the scope', function(){
        expect($scope.chats).toEqual(Chats.all());
    });

    it('should have a remove method that wraps Chats.remove', function(){

        var chat = { sender: 'me', receiver: 'you', message: 'hi!'};
        spyOn(Chats, 'remove');
        $scope.remove(chat);

        expect(Chats.remove).toHaveBeenCalledWith(chat);
    });
});
We also want tests that describe the way the controller is wired into the html since that’s where most of the logic actually gets expressed. Here’s the template: it ng-repeats a list. Each item is ng-clickable and has a dynamically generated link.
<ion-view view-title="Chats">
  <ion-content>
    <ion-list>
      <ion-item class="etc" ng-repeat="chat in chats" href="#/tab/chats/{{chat.id}}">
        <img ng-src="{{chat.face}}">
        <h2></h2>
        <p></p>
        <i class="icon ion-chevron-right icon-accessory"></i>

        <ion-option-button class="button-assertive" ng-click="remove(chat)">
          Delete
        </ion-option-button>
      </ion-item>
    </ion-list>
  </ion-content>
</ion-view>
And the test set up:
describe('tab-chats', function(){

    // Locals
    var $scope, $compile, $templateCache, compileProvider, Chats, template, ctrl;

    // Load app & ng-html2js pre-processed templates
    beforeEach(module('starter'));
    beforeEach(module('templates'));

    // Inject $compileProvider
    beforeEach(module(function($compileProvider) {
        compileProvider = $compileProvider;
    }));

    // Inject services,
    // Spin up the template as a directive with ChatsCtrl as its controller
    beforeEach(inject(function(_$rootScope_, _$compile_, _Chats_){

        $scope = _$rootScope_;
        $compile = _$compile_;
        Chats = _Chats_;

        // Behind the scenes, templateUrl will grab the template from $templateCache
        compileProvider.directive('chatsCtrlTest', function(){
            return {
                controller: 'ChatsCtrl',
                templateUrl:'templates/tab-chats.html'
            }
        });

        // Compile it and bind to $scope.
        template = angular.element('<chats-ctrl-test></chats-ctrl-test>');
        $compile(template)($scope);
        $scope.$digest();

        // If the Ionic starter app used 'controller as' syntax and bound its
        // variables to 'this', we could get the controller instance like this:
        ctrl = template.controller();
    }));
    ...
    // Tests
    ...
});
Now we can access the tab-chats DOM through ‘template’. Let’s make sure chats are actually getting listed, the delete button works, and each chat item links to the right view:
describe('tab-chats', function(){

   it('should show a list of chats', function(){

      var list = template.find('ion-item');
      var number_of_chats = $scope.chats.length;

      expect(list.length).toEqual(number_of_chats);

   });

   it('should call the remove method when delete is tapped', function(){

      var first_item = template.find('ion-item').first();
      var first_chat = $scope.chats[0];
      var button = first_item.find('ion-option-button');

      spyOn($scope, 'remove');
      button.triggerHandler('click');
      $scope.$digest();

      expect($scope.remove).toHaveBeenCalledWith(first_chat);

   });

   it('should link each item to the correct detail view', function(){

      var first_item = template.find('ion-item').first();
      var first_chat = $scope.chats[0];
      var expected_link = '#/tab/chats/' + first_chat.id;

      expect(first_item.attr('href')).toEqual(expected_link);
   })
});
Testing a directive that uses an ng-cordova plugin:
Let’s sketch a small directive that adds a chat sender’s name to the device’s contacts. NgCordova comes with its own set of mocks to help you develop in the browser. A nice tutorial for setting up your project to toggle between mock/browser and cordova/device builds can be found here. Fortunately, you can use the mocks in your tests without having to write an intricate build script. Just add them after ng-cordova in the karma.config.js files declaration.
files: [
       ...
       "www/lib/ngCordova/dist/ng-cordova.js",
       "www/lib/ngCordova/dist/ng-cordova-mocks.js",
       ...
],
Then load the ngCordovaMocks module after your app module at the top of a test. The mock methods will override the real ones.
describe('<add-contact>', function(){

    // Load app, cordova mocks
    beforeEach(module('starter'));
    beforeEach(module('ngCordovaMocks'));

    // ...
    // ...

})
Here’s our directive template: it’s a footer bar with a button inviting you to add a contact. It’s meant to sit at the bottom of the chats-detail view.
<ion-footer-bar align-title="left" class="..." ng-show="!contactAdded">
    <h1 class="title" >
      <span> Add  to contacts </span>
    </h1>
    <div class="buttons">
        <button class="..." ng-click="createContact()"></button>
    </div>
</ion-footer-bar>
And here’s the directive: It binds an object to the ‘contact’ attribute and has a method called ‘createContact’ that uses $cordovaContacts.
angular.module('starter')
  .directive("addContact", AddContact);

function AddContact($cordovaContacts){
    return {
       restrict: 'E',
       replace: true,
       scope: {contact: '='},
       templateUrl: 'templates/addContact.html',

       link: function(scope, elem, attrs){

          // Bound to ng-show in the template
          scope.contactAdded = false;

          // Bound to ng-click: adds to native contacts
          scope.createContact = function(){

            var contactInfo ={ "displayName": scope.contact.name };

            $cordovaContacts.save(contactInfo).then(function(result) {
                scope.contactAdded = true;
            }, function(error){
                scope.contactAdded = false;
            });
          }
        }
    };
 };
This directive is pretty fake but it has all the problems a real one would have: isolate scope, a service dependency that needs to be mocked and code inside a promise callback. We set the test up like this:
describe('<add-contact>', function(){

  // Locals
  var $scope, $compile, $cordovaContacts, scope, template;

    // Load app, cordova mocks, and ng-html2js pre-processed templates
    beforeEach(module('starter'));
    beforeEach(module('ngCordovaMocks'));
    beforeEach(module('templates'));

  // Inject services and compile directive
  beforeEach(inject(function(_$rootScope_, _$compile_, _$cordovaContacts_, _Chats_ ){

        $rootScope = _$rootScope_;
        $compile = _$compile_;
        $cordovaContacts = _$cordovaContacts_;

        //Get a chat to pass to the directive
        $rootScope.chat = _Chats_.all()[0];

        // Compile
        template = angular.element('<add-contact contact="chat"></add-contact>');
        $compile(template)($rootScope);
        $rootScope.$digest();

        // Access directive's scope
        scope = template.isolateScope();

    }));

    // ... Tests ...
To mock the ‘contact’ attribute value we’ve created a variable on $rootScope and referenced it in the DOM string that’s getting compiled. Then we’ve accessed the directive’s own scope by calling angular.element’s isolateScope() on the compiled directive. Let’s test the button:
it('should create a contact when the user taps the plus button', function(){

  var button = template.find('button');
  var expected_contact = { displayName: $rootScope.chat.name };

  spyOn(scope, 'createContact').and.callThrough();
  spyOn($cordovaContacts, 'save').and.callThrough();

  button.triggerHandler('click');
  $rootScope.$digest();

  expect($cordovaContacts.save).toHaveBeenCalledWith(expected_contact);

})
Using Jasmine’s callThrough method we can go from the button element down to the core of createContact() and verify that $cordovaContacts gets called with the correct data. ($cordovaContacts has to be called through as well or the underlying code will throw an error when it hits the ‘then’ statement).
Let’s test the code inside the promise callback and use an ng-cordova-mocks feature that lets you emulate callback error by setting a service’s ‘throwsError’ field to ‘true’:
it('should hide itself after adding a contact', function(){

  spyOn($cordovaContacts, 'save').and.callThrough();

  scope.createContact();
  $rootScope.$digest();

  expect(template.hasClass('ng-hide')).toBe(true);

});

it('should NOT hide itself if adding contact failed', function(){

  $cordovaContacts.throwsError = true;
  spyOn($cordovaContacts, 'save').and.callThrough();

  scope.createContact();
  $rootScope.$digest();

  expect(template.hasClass('ng-hide')).toBe(false);

})
Run the tests
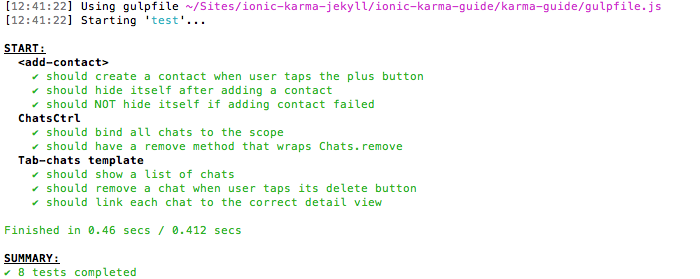
Run $ gulp test to see the report:
Contact
Feel free to ask questions or make suggestions via the issues page for this project. There are no special guidelines - just open an issue and write.